).
).Connect to the marketplace by clicking on the Connect icon
().
If the capacity graph is not visible, select Capacity Graph from Status pull-down menu. The Capacity graph appears.
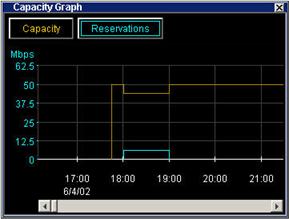
The capacity graph shows the bandwidth capacity available to be reserved. The capacity available is shown as a yellow line on the graph. Existing reservations are shown in blue. Note that you can not make a reservation when there is no capacity.
 ).
). ) on the menu-bar
or select Pack from the View pull-down menu. The agent window resizes
itself to accommodate the windows you are currently displaying.
) on the menu-bar
or select Pack from the View pull-down menu. The agent window resizes
itself to accommodate the windows you are currently displaying.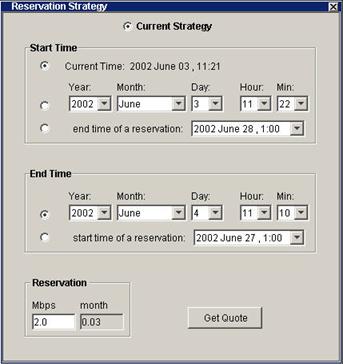
If the quantity (Mbps) or time units (month) do not suit your needs, you can change the units. Select Units from the Selection pull-down menu. The Units box lets you use Kbps, Mbps, or Gbps, as well as minutes, hours, days, or months, and dollars and cents.
In the Start Time panel, select when you want the reservation to begin. There are three choices for the start time of your reservation:
· Current Time: If you select Current Time, the reservation, if accepted, begins immediately. To select the present as a start time click the radio button on the left.
· Future time: If you want the reservation to start at a certain future time, enter the year, month, day, hour, and minute at which you want the reservation to start. You must make sure that the date is valid (not February 30th, for example). Should you inadvertently enter an invalid date, Merkato attempts to determine your intent and present an equivalent valid date. If this is not what you intended to specify, you will have the chance to refuse the reservation and return to the date selection window. To select a future start time click the radio button on the left.
· End time of a reservation: If you have already created one or more reservations, they appear in this pull-down list. You can select the end of one of these existing reservations as the start time of the new reservation you are making. Select it from the list and click the radio button on the left.
In the End Time panel, select when you want the reservation to end. There are two choices for the end time of your reservation:
· Future time: Enter the year, month, day, hour, and minute at which you want the reservation to end. You must make sure that the date is valid (not February 30th, for example). Should you inadvertently enter an invalid date, Merkato attempts to determine your intent and present an equivalent valid date. If this is not what you intended to specify, you will have the chance to refuse the reservation and return to the date selection window.
· Start time of a reservation: If you have already created one or more reservations, they appear in this pull-down list. You can select the start of one of these existing reservations as the end time of the new reservation you are making. Select it from the list and click the radio button on the left.
Enter the amount of bandwidth you want in the Reservation portion of the box.
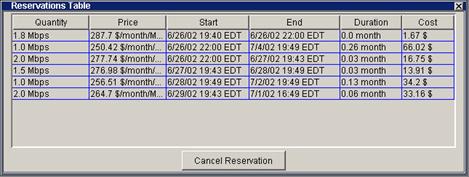
If you are satisfied that the quantity and duration specified, click Get Quote. A confirmation box appears.
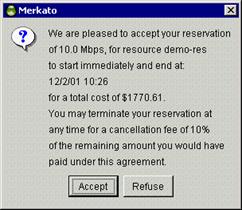
If the price and cancellation fee are acceptable, click Accept. Otherwise, click Refuse and revise your reservation request.
Once you click Accept your reservation is activated.